Careful planning shows in unique home-built camper
- Sarah Tucker
- Aug 26, 2018
- 8 min read

by: Nicholas Tilleman
Nicholas and Liz Tillemans have always enjoyed traveling and camping, so several years ago they bought a 5 X 8 teardrop trailer. It served them well until their son, Graham, now 7, outgrew it. After making several modifications to their first teardrop, Nick decided he wanted to design and build his own camper. When he put pencil to paper on an original design and started a mock-up, he knew he was in for a daunting task. It took a lot of planning and many man-hours, but they’re proud of the finished product and love camping with it.

Q: What inspired you to build a teardrop (or tiny camper)?

A: We purchased a 5x8 teardrop trailer a few years ago from a couple who had just started building campers. We loved it and used it a lot. It had a bunk for my son and we squeezed in a queen-sized mattress. It was very comfortable and practical. It was nice to have a real bed off the ground and a place to keep all our camping stuff in the back galley. It made getting away for the weekend much easier. I added solar power, remounted the tire and put a tongue box on the front. As much as we enjoyed it, I knew that we would outgrow it. The bunk was getting too small for my son, so I built a fold-out box. I wasn’t entirely happy with that solution or the aesthetic of it. While building the fold-out box, I tapped online resources such as TnTTT.com and saw all sorts of unique, cool builds. In my research, I realized that I could build a trailer that would custom fit our needs and incorporate unique features. I liked the Wild Goose designs and stumbled across the Alto trailer, which is something between the Wild Goose Design and the T@B, but basically a hard-sided pop-up in concept. I started working out a design on graph paper last fall.


Q: How did you settle on your design?
A: My original design draft was 5 1/2 feet tall with a hatch that would be about 8 feet in length and give us over 6 feet of headroom with the hatch raised. I wanted to have doors on either side and knew I would need a substantial frame to anchor an 8-foot hatch, and that would interfere with the doors. Knowing that rainwater from the roof would drain right over the side doors, I shifted to a shorter hatch. Also, I considered the available materials; 4 x 8 plywood sheets are standard, so the non-deployed height shrank to 4 feet and the hatch length shrank to 6 feet. I think the original height would have been too tall for our garage anyway.

In many respects, I allowed function to drive form. The dual-angled profile of the hatch allows more headroom over the banquet area at the back and it looks better. Inside, many functional elements drove the design. We needed a bunk for my son, seating for three or four and a queen-sized mattress. We needed some sort of galley at the back for our chuckbox/galley items and a full door. An important concern was making the camper usable without the need to raise the hatch. We sleep comfortably with the hatch up or down.
There were many ideas in play. I had to squeeze everything in and yet give the camper a feeling of comfort, openness and connection with the outdoors. My son’s bunk ended up in the front, the queen bed in the middle and the benches at the back with storage underneath. The benches are also accessible from the outside rear of the trailer. It all fit together that way. I actually settled on that configuration very early in the design phase.


Other design decisions were driven more by caprice. A chief consideration was incorporating large side windows to bring the outside light in. The side windows were always an aesthetic priority. Making the side windows watertight and functional was an ongoing concern throughout the build. The front profile could have looked any number of ways. It could have been curved like a traditional teardrop or angled at any number of points at any number of different angles; but the final profile was the clear winner. As it turns out the aerodynamic look is truly aerodynamic. I suppose there were many ways this could have gone.
I worked out everything I could in advance on graph paper before making any cuts. I even used SketchUp to do some 3D modeling. Some decisions waited until we were well into the build; and those decisions were easier to make when we could see it all in real life. Sometimes we ran out of runway and were left with fewer options, which made some choices easier.

Q: What were some of the challenges and solutions?
A: We have a small garage where we kept our first smaller teardrop. We weren’t ready to sell our smaller trailer until we had a functional replacement, so we had to find a place to store it before we could purchase a trailer to build on. For me, that meant that I needed to prove the concept of the new trailer before purchasing.
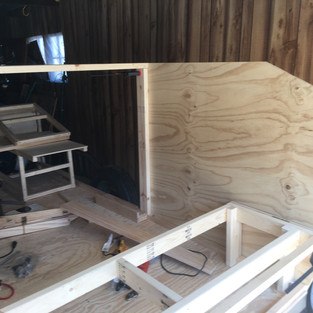
At first, the whole project seemed almost a bit crazy and overwhelming. I’ve built furniture and a small play shed for my son, but this was more daunting. And I wasn’t exactly sure how I would make the back end work. So, I mocked up the back end in our basement. I didn’t even know what trailer I would build it on. I cleared out a corner of our basement and spent the winter building the components for the back end. The space was tight, but I got a lot built down there … so much that some people wondered whether I would be able to get it out of the basement.

At some point, it became clear that the new camper build was feasible and had the potential to be really cool. In the process of mocking up the back end in the basement, my wife was able to picture it and became sold on it. Once she was fully on board and she gave me the all clear, I spent a lot of time looking for a trailer we could build on.


I didn’t know whether I would be building on a smaller trailer with an overhang or a trailer that would entirely support the camper. We found an open 6 x 10 trailer manufactured by the same company that built the trailer of our first 5x8 teardrop. I needed it to be a half foot longer to make everything fit. I discussed my options with one of the trailer builders, who came up with the answer. They built out 6 inches over the tongue to give us the space. Somehow, I underestimated the overall width of the trailer; and for a moment, when I got the trailer home, I was afraid that I would not be able to fit the trailer through our garage door. Thankfully, I was just able to squeeze it in.
Once we had the camper built we were barely able to squeeze it out of the garage. A body-builder boyfriend of one of our neighbors happened upon us when we were pulling out the trailer and helped us muscle it out. It was almost like birthing a child to get it out of the garage. We will eventually need to widen our garage door.
Making the side windows work was also a challenge. And the solution came almost by accident. When I ran out of clamps while mocking up everything in the basement, I used carriage bolts to clamp on the side windows. My wife and I discussed options. She asked some insightful questions; and I had been kicking around a lot of ideas. Ultimately, I realized that sliding the windows in and out on those carriage bolts would be instrumental to their functionality. We ended up using the carriage bolts to slide the widows in and out of position. Originally, I was going to try to create a seal between two pieces of angle when the hatch lifted into position; but I was afraid my degree of precision would not be adequate.
I also was concerned about water getting into the roof seams. I didn’t want to use trim. I felt trim might cause water to pool on the roof. Instead of using trim, we sealed all the seams with Poor Man’s Fiberglass (strips of fabric and waterproof glue.) We were not able to cut the strips or to apply them perfectly straight. I was afraid that my OCD would come out. But those strips give the trailer a cool vintage vibe that I like. And they give me a lot of reassurance when the rain comes.
The hatch is quite heavy and it takes two people to deploy the back end. I lift the hatch while my wife folds up the rear wall and slides the side windows into position. It goes quick. We’re a well-oiled machine. It would nice to have actuators or gas struts to assist with the lift, but I’m not sure where we would tie them in. For now, our challenge is to stay fit. Eventually, we may find a way to tie in some gas struts.
Q: Tell us about the building process.
A: For a month or two, we spent every weekend working on it and also three or more hours after work every night. It became somewhat grueling and took a lot of man-hours. It was helpful to be part of online communities. We belong to several Facebook communities, DIY Teardrop Campers Community and Squaredrop Camper group, where we found good advice.
I was hoping to get a lot of work done in April when we purchased the trailer. I had a week off from work, but the weather did not cooperate. We had a major snow storm. I felt overwhelmed. I felt as if the whole Universe was against us. However, we made steady progress when the weather warmed up. And my confidence improved.
I found that 4 x 8 sheets of 3/4 inch plywood were too unwieldy for me to handle alone, so my wife was a big help. I don’t know how I would have moved everything around without her help. My son also helped with screwing together his bunk and handing me screws when I needed them throughout the build. Once we got the major build underway, my wife was there to help every step of the way.
I found it was a challenge to get everything square in three-dimensional space. Levels are only so accurate, and it was hard to find register points that we knew were truly square and where they should be. Wood is not always precise and often slightly twisted. But it is also forgiving in many respects and can be twisted and pushed into position. I tried hard to keep everything within an eighth of an inch from square. At just a few points I know we were off as much as half an inch or more. And it was unavoidable. But those imperfections worked themselves out over spans of 6 feet or more. We had to make lemonade out of lemons on some things, but it all came out just fine.
My wife made all the curtains, cushions and pillows. She also knitted an octopus mascot for our trailer.
Q: Share some of your sources for both ideas and parts.
A: We purchased windows and doors from Vintage Technologies. The exterior plywood all came from a local lumber yard. Almost everything else came from Menards, Home Depot and Ace Hardware. Fabrics came from JoAnn Fabrics; paint from Hirschfield’s. And we found inspiration and wisdom from TnTTT.com and the Facebook Communities we belong to.
Q: Share something about your first camping trip in your new trailer.
A: We literally pulled the camper out of the garage and attached the fenders the day we were heading out for a week-long summer vacation to Michigan’s Upper Peninsula. The camper towed straight and we got 24 mpg, which meant it towed like a dream. We didn’t see it fully deployed outside of the garage until we were at our first campsite on the shores of Lake Superior. We didn’t even know if it was watertight until our first thunderstorm at a campsite on the Keweenaw Peninsula. We realized how functional the galley was when we made our first stop for sandwiches in a roadside park. We had a lot of interest in our build from fellow campers, which was fun. We also got a lot of much needed sleep. It is very comfortable.

(The Tillemans live in St. Paul, Minnesota, where Nick works for the local phone company and Liz is a buyer for an adult gift store. Nick has written and self-published several books and they enjoy brewing their own beer. Both are BJCP Certified craft beer judges.)


