Restoring a WWII era teardrop
- Sarah Tucker
- Dec 21, 2017
- 4 min read

Editor's Note: I found Taylor Long on Instagram and immediately fell in love with his restoration project. He has meticulously restored a gorgeous teardrop and agreed to share his story with Cool Tears. Find him on Instagram here https://www.instagram.com/wood_art_restoraton_history/?hl=en

I had been looking for a teardrop for three years when I came across an ad on Craigslist for an old trailer. The listing only gave me one photo description and one sentence with the price of $3000. So I immediately called to organize a visual inspection. Long story, short...the trailer sat in an old hidden away body shop that you would never expect to find. But there it was, parked under an overgrown carpentry and covered in mold. It was packed with leaves and appeared to have a tarp protecting it from the weather but that literally was disintegrated off. The trailer had a few corroded holes on the roof side. The moldings, rear kitchen, and rear panels in the galley area ware all rotted.


The wooden cabinets and chrome deco style hardware indicated that the trailer was made around the 1930s and 40s. The floor was made of wooden planks with smaller thin strips covering the gaps. There was an interior cabinet and to my surprise it had all registration slips pinned on both doors. The registration said it was a home built 1940 teardrop trailer I was so thrilled and decided I had to have it. So I made an offer of $2500.


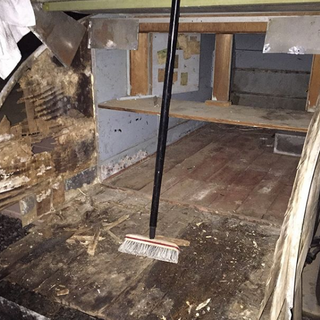


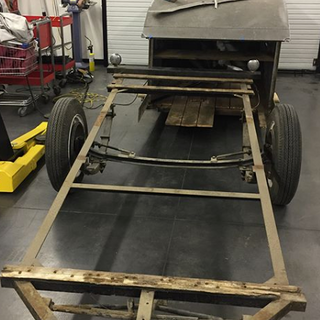
Since the tires were bad, I couldn’t haul it home, so I got a trailer to take it home. I was so excited to start working on it! I first gave it a bath, then I inspected in and out to see what I should start on first. I noticed the rear kitchen area was the worst part on the trailer so I started in this area. I took out all of the rotted wood cabinets and rotted floor. Next, the corroded side panels with rotted wood panels were so bad that you could see right through them. The aluminum on the side fell apart in a powdery substance. My next move was to separate the body from the frame. I took the body off the frame and took the whole floor out of the teardrop. The rust was removed and the frame was painted.


I attached brand new PVC flooring to the bottom of the teardrop to make it strong and water resistant. As I took out the rotted floor, right in the middle of the teardrop was a stamped dog tag that red George J Homes. I wonder if that was the person who originally built the teardrop? The registration does not list that name but it was an interesting find.
Next, I addressed getting new aluminum sheeting for the sides. I also needed to make the kitchen strong and water resistant, yet keep it in the historical look. I read an article that stated teardrops in the 1940s were built using old bombers plane parts. I did notice that the rear hatch seemed to resemble the door of an airplane, showing many rivets and a window that was covered by extra sheets of aluminum. Right above the window there was a clear plastic hole that you could see right through. Much of the structural framing of the teardrop had a lot of the non-corrosive paint that was used on airplanes in World War II and also had stamped numbering and lettering. Knowing my trailer was very possibly made from an old airplane, I went for a World War II bomber theme for the design. Next I drew up some designs on what my teardrop should look like after doing a lot of research on how World War II bombers looked on the interior and exterior.

First I had to repair the corroded holes and panels. I wanted to keep to the rivet theme, so I riveted new aluminum panels and replaced all of the side screws to a stainless steel screw. Next I removed the tires and rims from the teardrop and got new wheel bearings, tires and painted the rims black. I also wanted original 40s fenders so I search day and night and finally found a pair of original 40s Ford fenders.


The interior had a lot of room but I needed more space because I’m 6’ 3” and the bed area was only 5’ 6”. So I moved the kitchen wall, gaining more space for me to lay. The kitchen area did shrink but it will still make it work. There is a large area near the front of the teardrop, on the inside, that I wanted to build a custom cabinet. I used some left over aluminum that was taken from the wall that divided the kitchen from the interior of the teardrop. I first made templates out of cardboard and then cut the aluminum. I bought some hinges and hardware that I thought would go well for with theme but I did reuse the original handles from the kitchen.

I wanted a wooden and polished aluminum ceiling so I handcrafted it. I also built a wooden shelf on the interior of the cabinet. The interior the teardrop was insulated and painted. It had a window in the door but I wanted a window that matched style of an old bomber airplane, so I handmade a polyurethane clear window with aluminum bars.
I got all new vintage style lighting. I found glass stop lights and rear reverse lights off an old Volkswagen and the side marker lights are old stock marker lights. When opening the kitchen, I have custom metal box cabinets that are hand-painted oxygen tank because that’s what bombers had for oxygen supply up in the aircraft. I used copper pipe to cover the wires where the marker lights are. The lighting for the interior are LED rechargeable lights. I was trying to make the trailer very lightweight, so there is no battery hook up everything is rechargeable and can be removed.


I spent many hours polishing the exterior of the trailer and am still amazed how it turned out. It resembles a mirror like finish. I plan on keeping it in my family for generations and passing it on. It is taken me a full year to restore this trailer but it was well worth it in the end. I plan on taking it to the mountains, deserts, beaches and maybe a long road trip across the US.